Linux 内核中的 SELinux 机制

安全增强式Linux(SELinux,Security-Enhanced Linux)是一个Linux内核的安全模块,其提供了访问控制安全策略机制,包括了强制访问控制(Mandatory Access Control,MAC)。
能力
SELinux 是什么
SELinux 是一个灵活的强制访问控制(MAC)系统,内置于 Linux 内核中。SELinux 为管理员提供了一种全面的访问控制机制,使其能够比现有的 Linux 自主访问控制(DAC)更精细地管理权限,并存在于许多主要的 Linux 发行版中。
它最初是作为 Linux 内核的一系列补丁,由美国国家安全局(NSA)利用 Linux 安全模块(LSM)开发而成。
SELinux 于 2000 年发布到开源社区,并于 2003 年集成到上游 Linux 内核中。
DAC(Discretionary Access Control,自主访问控制)
对于 DAC 而言,文件和进程都有相应的所有者。您可以让用户拥有某个文件,让群组拥有某个文件,或让其他人(可以是其他任何人)拥有某个文件。用户可以更改自己文件的权限。在没有使用 SELinux 的操作系统中,决定一个资源是否能被访问的因素是:某个资源是否拥有对应用户的权限(读、写、执行)。只要访问这个资源的进程符合以上的条件就可以被访问。
根用户对 DAC 系统拥有完全访问控制权。如果拥有根访问权限,则可以访问其他任何用户的文件,或在系统上执行任何操作,这也是最致命的问题。
MAC(Mandatory Access Control,强制访问控制)
传统上, Linux 和 UNIX 系统都采用 DAC,而 SELinux 是 Linux 采用 MAC 系统的示例。
强制访问控制模型 (MAC, Mandatory Access Control), 是为了弥补 DAC 权限控制过于分散的问题而诞生的。在计算机安全领域指一种由操作系统约束的访问控制,目标是限制主体或发起者访问或对对象或目标执行某种操作的能力。任何主体对任何对象的任何操作都将根据一组**授权规则(也称策略)**进行测试,决定操作是否允许。
即使是以 root 身份运行的服务进程,一般也只能访问到它所需要的资源。即使程序出了漏洞,影响范围也只有在其允许访问的资源范围内。安全性大大增加。
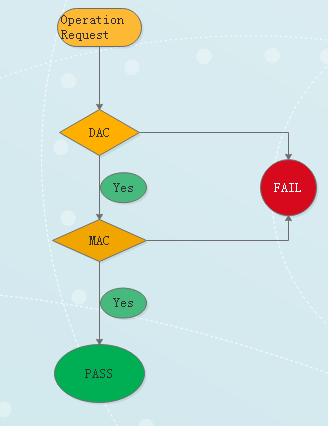
MAC 的目的是弥补 DAC 的不足,而不是用來取代 DAC。
使用 SELinux 的好处
- 所有进程和文件都被标记。SELinux 策略规则定义了进程如何与文件交互,以及进程如何相互交互。只有存在明确允许的 SELinux 策略规则时,才能允许访问。
- 精细访问控制。传统的 UNIX 通过用户的授权、基于 Linux 的用户和组进行控制。而 SELinux 的访问控制基于所有可用信息,如 SELinux 用户、角色、类型以及可选的安全级别。
- SELinux 策略由系统管理员进行定义,并在系统范围内强制执行。
- 改进了权限升级攻击的缓解方案。进程在域中运行,因此是相互分离的。SELinux 策略规则定义了如何处理访问文件和其它进程。如果某个进程被破坏,攻击者只能访问该进程的正常功能,而且只能访问已被配置为可以被该进程访问的文件。例如:如果 Apache HTTP 服务器被破坏,攻击者无法使用该进程读取用户主目录中的文件,除非添加或者配置了特定的 SELinux 策略规则允许这类访问。
- SELinux 可以用来强制实施数据机密性和完整性,同时保护进程不受不可信输入的影响。
接口和使用方法
基本概念
SELinux 通过 MAC 方式来管控进程,进程是主体,而目标则是该进程想要读取的资源。
-
主体 Subject:可以看成就是进程。
-
目标 Object:目标资源,被主体访问的资源。可以是文件、目录、端口等。
-
政策 Policy:
系统中通常有大量的文件和进程,为了节省时间和开销,通常我们只是选择性地对某些进程进行管制。
而哪些进程需要管制、要怎么管制是由政策决定的。
一套政策里面有多个规则。部分规则可以按照需求启用或禁用(以下把该类型的规则称为布尔型规则)。
在 CentOS 7 系统中,有三套政策,分别为:targeted:对大部分网络服务进程进行管制。这是系统默认使用的政策(下文均使用此政策)。minimum:以targeted为基础,仅对选定的网络服务进程进行管制。一般不用。mls:多级安全保护。对所有的进程进行管制。这是最严格的政策,配置难度非常大。一般不用,除非对安全性有极高的要求。
-
安全上下文 security context:
只有两者的安全上下文对应上了,主题才能访问目标。它们的对应关系由政策中的规则决定。
SELinux 状态和模式
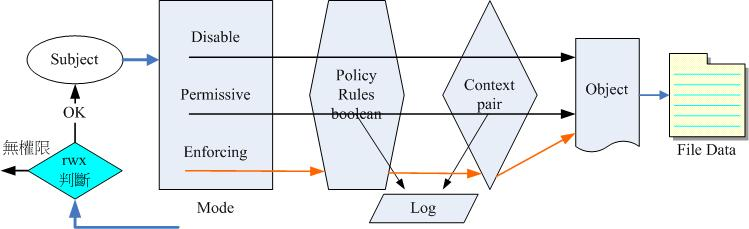
SELinux 可使用三种模式之一运行: enforcing(强制)、permissive(宽容)或 disabled(禁用)。
- Enforcing 模式是默认操作模式,在 enforcing 模式下 SELinux 可正常运行,并在整个系统中强制实施载入的安全策略。
- 在 permissive 模式中,系统会象 enforcing 模式一样加载安全策略,包括标记对象并在日志中记录访问拒绝条目,但它并不会拒绝任何操作。不建议在生产环境系统中使用 permissive 模式,但 permissive 模式对 SELinux 策略开发和调试很有帮助。
- 强烈建议不要使用禁用(disabled)模式。它不仅会使系统避免强制使用 SELinux 策略,还会避免为任何持久对象(如文件)添加标签,这使得在以后启用 SELinux 非常困难。
检查 SELinux 的运行模式
使用 getenforce 或 sestatus 命令检查 SELinux 的运行模式。
getenforce 命令返回 Enforcing、Permissive 或 Disabled。
sestatus 命令返回 SELinux 状态以及正在使用的 SELinux 策略:
$ sestatus
SELinux status:                 enabled
SELinuxfs mount:                /sys/fs/selinux
SELinux root directory:         /etc/selinux
Loaded policy name:             targeted
Current mode:                   enforcing
Mode from config file:          enforcing
Policy MLS status:              enabled
Policy deny_unknown status:     allowed
Memory protection checking:     actual (secure)
Max kernel policy version:      31
更改 SELinux 状态和模式
使用 setenforce 实用程序在 enforcing 模式和 permissive 模式之间切换。使用 setenforce 所做的更改在重新引导后不会保留。要更改为 enforcing 模式,以 Linux root 用户身份输入 setenforce 1 命令。要更改为 permissive 模式,输入 setenforce 0 命令。
# setenforce 0
# getenforce
Permissive
# setenforce 1
# getenforce
Enforcing
也可以通过更改配置文件来永久更改 SELinux 模式。
# vi /etc/selinux/config
# This file controls the state of SELinux on the system.
# SELINUX= can take one of these three values:
#       enforcing - SELinux security policy is enforced.
#       permissive - SELinux prints warnings instead of enforcing.
#       disabled - No SELinux policy is loaded.
SELINUX=permissive
# SELINUXTYPE= can take one of these two values:
#       targeted - Targeted processes are protected,
#       mls - Multi Level Security protection.
SELINUXTYPE=targeted
# reboot
需要注意的是,如果系统已经在关闭 SELinux 的状态下运行了一段时间,再打开 SELinux 之后的第一次重启速度可能会比较慢。因为系统必须为磁盘中的文件创建安全上下文。
安全上下文
格式
每个进程和系统资源都有一个特殊的安全性标签,称为 SELinux 上下文(context)。SELinux 上下文有时被称为 SELinux 标签,它是一个提取系统级别细节并专注于实体的安全属性的标识符。这不仅提供了在 SELinux 策略中引用对象的一个一致方法,而且消除了在其他身份识别系统中可能存在的模糊性。例如,某个文件可以在使用绑定挂载的系统中有多个有效的路径名称。
SELinux 策略在一系列规则中使用这些上下文,它们定义进程如何相互交互以及与各种系统资源进行交互。默认情况下,策略不允许任何交互,除非规则明确授予了相应的权限。
Linux 用户的安全上下文由 SELinux 用户、SELinux 角色和 SELinux 类型组成。例如:
User:Role:Type:Level
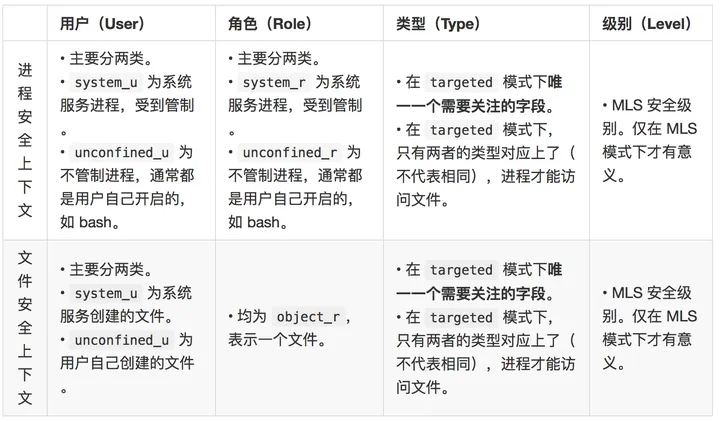
需要注意的是,第三个域即类型域在进程和文件上又有不同的称呼
- type:在文件资源(object)上面称为类型(type)
- domain:在主体进程(subject)则称为域(domain)
查询安全上下文
# 查询进程的安全上下文
[root@localhost ~]# ps -auxZ | egrep 'bash|chronyd|LABEL'
LABEL                                                 USER   ...  COMMAND
system_u:system_r:chronyd_t:s0                        chrony ...  /usr/sbin/chronyd -F 2
unconfined_u:unconfined_r:unconfined_t:s0-s0:c0.c1023 root   ...  -bash

# 查询文件的安全上下文
[root@localhost ~]# ll -Z /usr/sbin/chronyd /etc/chrony.keys
-rw-r-----. 1 root chrony system_u:object_r:chronyd_keys_t:s0    540 Aug 29  2022 /etc/chrony.keys
-rwxr-xr-x. 1 root root   system_u:object_r:chronyd_exec_t:s0 353408 Apr 17 07:40 /usr/sbin/chronyd

[root@localhost ~]# ll -Zd /root/anaconda-ks.cfg /home/vbird
drwx------. 2 vbird vbird unconfined_u:object_r:user_home_dir_t:s0  113 Aug  4 13:43 /home/vbird
-rw-------. 1 root  root  system_u:object_r:admin_home_t:s0        1204 Aug  4 13:05 /root/anaconda-ks.cfg
安全上下文的修改
手动修改
使用 chcon 手动修改安全上下文类型。
[root@localhost ~]# chcon [OPTION]... [-t TYPE] FILE...
[root@localhost ~]# chcon [OPTION]... --reference=RFILE FILE...
选项与参数:
-t  :后面接安全上下文的类型,例如 httpd_sys_content_t
--reference=RFILE:用文件名为 RFILE 当范例來修改后续接的文件的类型

# 将 /etc/hosts 复制到 /dev/shm/hosts,并修改类型为 etc_t
[root@localhost ~]# cd /dev/shm
[root@localhost shm]# cp -a /etc/hosts .
[root@localhost shm]# ll -Z hosts
-rw-r--r--. 1 root root system_u:object_r:net_conf_t:s0 158 Jun 23  2020 hosts

[root@localhost shm]# chcon -t etc_t hosts
[root@localhost shm]# ll -Z hosts
-rw-r--r--. 1 root root system_u:object_r:etc_t:s0 158 Jun 23  2020 hosts

# 将类型改成与 /var/spool/mail 相同
[root@localhost shm]# ll -Zd /var/spool/mail/
drwxrwxr-x. 2 root mail system_u:object_r:mail_spool_t:s0 19 Jul 21 15:01 /var/spool/mail/

[root@localhost shm]# chcon --reference=/var/spool/mail hosts
[root@localhost shm]# ll -Z hosts
-rw-r--r--. 1 root root system_u:object_r:mail_spool_t:s0 158 Jun 23  2020 hosts
使用目录的默认安全上下文来修改
目录是有默认的安全上下文的。可以使用 semanage 来查询和修改目录的默认安全上下文。
semanage {login|user|port|interface|fcontext|translation} -l
semanage fcontext -{a|d|m} [-frst] file_spec

选项与参数:
        fcontext:主要用在安全上下文方面的用途, -l 为查询
        -a:增加;可以增加一些目录的默认安全上下文类型设置
        -m:修改
        -d:删除
例如查询 /etc/sysconfig 相关的默认 SELinux 安全上下文类型:
[root@localhost ~]# semanage fcontext --list | grep /etc/sysconfig
SELinux fcontext              type           Context
/etc/sysconfig/.*l2tpd        regular file   system_u:object_r:l2tp_conf_t:s0
/etc/sysconfig/MailScanner    regular file   system_u:object_r:mscan_etc_t:s0
假设我们想要创建一个名为 /www 的目录,我们想要指定其安全上下文默认值与 /var/www 目录相同:
# 1. 先找到 /var/www 的类型是什么
[root@localhost ~]# semanage fcontext -l | grep '/var/www('
/var/www(/.*)?              all files   system_u:object_r:httpd_sys_content_t:s0
/var/www(/.*)?/logs(/.*)?   all files   system_u:object_r:httpd_log_t:s0

# 2. 建立所需目录,并且查看其预设的安全上下文的值
[root@localhost ~]# mkdir /www
[root@localhost ~]# echo check > /www/index.html
[root@localhost ~]# ll -Zd /www /www/index.html
drwxr-xr-x. 2 root root unconfined_u:object_r:default_t:s0 24 Jul 22 14:40 /www
-rw-r--r--. 1 root root unconfined_u:object_r:default_t:s0  6 Jul 22 14:40 /www/index.html
# 值为 default_t

# 3. 增加 /www 默认为 httpd_sys_content_t 的类型
[root@localhost ~]# semanage fcontext -a -t httpd_sys_content_t "/www(/.*)?"
[root@localhost ~]# semanage fcontext -l | grep '^/www'
/www(/.*)?    all files     system_u:object_r:httpd_sys_content_t:s0
现在,我们已经设置好了 /www 的默认类型,可以使用 restorecon 直接把文件或目录的安全上下文恢复到默认值。
[root@localhost ~]# restorecon -Rv /www
Relabeled /www from unconfined_u:object_r:default_t:s0
  to unconfined_u:object_r:httpd_sys_content_t:s0
Relabeled /www/index.html from unconfined_u:object_r:default_t:s0
  to unconfined_u:object_r:httpd_sys_content_t:s0
端口安全上下文查询与修改 -- 使用 semanage port
一个端口的 SELinux 安全上下文通常只包括类型信息。
semanage port -l 用于查看所有端口的安全上下文,例如:
[root@localhost ~]# semanage port --list | grep http
http_cache_port_t  tcp  8080, 8118, 8123, 10001-10010
http_cache_port_t  udp  3130
http_port_t        tcp  80, 81, 443, 488, 8008, 8009, 8443, 9000
也可以添加某类进程允许访问的端口,例如:
[root@localhost ~]# semanage port -a -t TYPE -p [tcp|udp] port_range
-a   新增一个记录
-t   修改的端口类型,例如 httpd_port_t
-p   使用 tcp 或 udp 协议
port_range 使用的端口号

# 加入 port 98 的使用到 http 中
[root@localhost ~]# semanage port -a -t http_port_t -p tcp 98
[root@localhost ~]# semanage port --list | grep http
http_port_t    tcp     98, 80, 81, 443, 488, 8008, 8009, 8443, 9000
SELinux 政策内的规则管理
getsebool -a 命令列出规则布尔值(规则是打开还是关闭状态)。
~]$ getsebool -a
cvs_read_shadow --> off
daemons_dump_core --> on
setsebool 修改 SELinux 规则的布尔值。
setsebool [-p] [规则名称][0|1]

-P:直接将设置值写入配置文件,该设置数据未来会生效
# 范例:查询 httpd_enable_homedirs 这个规则的状态,并且修改这个规则为不同的布尔值
[root@study ~]# getsebool httpd_enable_homedirs
httpd_enable_homedirs --> off                        # 关闭状态
[root@study ~]# setsebool -P httpd_enable_homedirs 1                # 开启它
[root@study ~]# getsebool httpd_enable_homedirs
httpd_enable_homedirs --> on
seinfo 可用于描述策略的细分,如类、类型、布尔值、允许规则等。
seinfo [-Atrub]

选项与参数:
        -A:列出 SELinux 的状态、规则布尔值、身份识别、角色、类型等所有信息
        -u:列出 SELinux 的所有身份识别 user 种类
        -r:列出 SELinux 的所有角色 role 种类
        -t:列出 SELinux 的所有类型 type 种类
        -b:列出所有规则的种类(布尔值)
~]# seinfo

Statistics for policy file: /sys/fs/selinux/policy
Policy Version & Type: v.28 (binary, mls)

   Classes:            77    Permissions:       229
   Sensitivities:       1    Categories:       1024
   Types:            3001    Attributes:        244
   Users:               9    Roles:              13
   Booleans:          158    Cond. Expr.:       193
   Allow:          262796    Neverallow:          0
   Auditallow:         44    Dontaudit:      156710
   Type_trans:      10760    Type_change:        38
   Type_member:        44    Role allow:         20
   Role_trans:        237    Range_trans:      2546
   Constraints:        62    Validatetrans:       0
   Initial SIDs:       27    Fs_use:             22
   Genfscon:           82    Portcon:           373
   Netifcon:            0    Nodecon:             0
   Permissives:        22    Polcap:              2
sesearch 搜索策略中的特定规则。
sesearch [-A] [-s 主体类别] [-t 目标类别] [-b 布尔值]

选项与参数:
        -A:列出后面数据中,允许「读取或放行」的相关数据
        -t:后面还要接 type、例如 -t httpd_t
        -b:后面接 SELinux 的规则,例如 -b httpd_enable_ftp_server
# 范例:找出 crond_t 主体进程能够读取的文件 SELinux type
[root@study ~]# sesearch -A -s crond_t | grep spool
   allow crond_t var_spool_t : dir { ioctl read getattr lock search open } ;
   allow crond_t system_cron_spool_t : dir { ioctl read getattr lock search open } ;
   allow crond_t user_cron_spool_t : lnk_file { read getattr } ;
   allow crond_t user_cron_spool_t : file { ioctl read write create getattr setattr lock append unlink link rename open } ;
   allow crond_t system_cron_spool_t : file { ioctl read write create getattr setattr lock append unlink link rename open } ;
   allow crond_t var_spool_t : file { ioctl read getattr lock open } ;
   allow crond_t cron_spool_t : file { ioctl read write create getattr setattr lock append unlink link rename open } ;
   allow daemon user_cron_spool_t : file { ioctl read write getattr lock append } ;
   allow crond_t cron_spool_t : dir { ioctl read write getattr lock add_name remove_name search open } ;
   allow crond_t user_cron_spool_t : dir { ioctl read write getattr lock add_name remove_name search open } ;
   allow crond_t user_cron_spool_t : file { ioctl read write create getattr setattr lock append unlink link rename open } ;
   allow crond_t system_cron_spool_t : file { ioctl read write create getattr setattr lock append unlink link rename open } ;
案例:当 port 出问题时:让 httpd 开放在非正规端口
如果 auditd 守护进程正在运行,则 SELinux 拒绝信息会默认写入 /var/log/audit/audit.log :
type=AVC msg=audit(1223024155.684:49): avc: denied { getattr } for pid=2000 comm="httpd" path="/var/www/html/file1" dev=dm-0 ino=399185 scontext=unconfined_u:system_r:httpd_t:s0 tcontext=system_u:object_r:samba_share_t:s0 tclass=file
另外,类似以下的消息被写入 /var/log/message 文件中:
May 7 18:55:56 localhost setroubleshoot: SELinux is preventing httpd (httpd_t) "getattr" to /var/www/html/file1 (samba_share_t). For complete SELinux messages. run sealert -l de7e30d6-5488-466d-a606-92c9f40d316d
接下来我们模拟一个场景,让 httpd 使用非正规的 377 端口:
# 1. 修改端口号码
[root@localhost ~]# vim /etc/httpd/conf/httpd.conf
Listen 377

# 2. 尝试启动 httpd 服务
[root@localhost ~]# systemctl start httpd
Job for httpd.service failed because the control process exited with error code.
See "systemctl status httpd.service" and "journalctl -xeu httpd.service" for details.
_# 如上所示,提示出现错误_

# 3. 确认 /var/log/messages 是否记录错误解决方案
[root@localhost ~]# grep setrouble /var/log/messages | grep sealert
Aug  4 22:13:38 localhost setroubleshoot[3553]: SELinux is preventing /usr/sbin/httpd
  from name_bind access on the tcp_socket port 377. For complete SELinux messages
  run: sealert -l 525fe157-a16b-47c4-ad8d-11bad86c9e9a
# 找到 sealert 关键字

# 4. 运行找到的 sealert 指令,并依据提示处理问题
[root@localhost ~]# sealert -l 525fe157-a16b-47c4-ad8d-11bad86c9e9a
SELinux is preventing /usr/sbin/httpd from name_bind access on the tcp_socket port 377.

*****  Plugin bind_ports (99.5 confidence) suggests   ************************

If you want to allow /usr/sbin/httpd to bind to network port 377
Then you need to modify the port type.
Do
# semanage port -a -t PORT_TYPE -p tcp 377
    where PORT_TYPE is one of the following: http_cache_port_t, http_port_t, ...

***  Plugin catchall (1.49 confidence) suggests   **************************
....
sealert 是 setroubleshoot 包提供的工具。sealert 可能会提供好几个解决方案,选择置信度最高的即可。
[root@localhost ~]# semanage port -a -t http_port_t -p tcp 377
[root@localhost ~]# systemctl restart httpd
原理
LSM
Overview
Linux 安全模块(英语:Linux Security Modules,简称 LSM)是 Linux 内核中用于支持各种计算机安全模型的框架,它与任何单独的安全实现无关。这个框架使用 GNU 通用公共许可证授权,并且从 Linux 2.6 开始成为官方 Linux 内核的一部分。目前,AppArmor、SELinux、Smack、TOMOYO Linux 和 Yama 是官方 Linux 内核中支持的安全模块。
简单来说,LSM 是目前 linux 的安全框架,而 SELinux 是其中的一个 modules。
LSM 在 linux 安全体系中所处位置可以用下图表述:
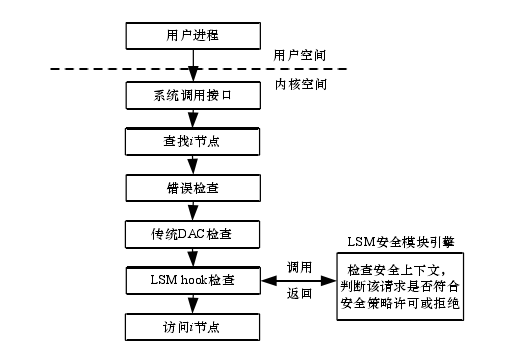
LSM 在内核系统调用逻辑中提供了一套钩子(hooks)。LSM hook 会插入到访问 kernel 对象前面,DAC 检查之后,然后 LSM 调用系统中启用的访问控制模块,检查是否可以访问。若有多个访问控制模块,会根据初始化的优先顺序执行,都允许访问才能进一步访问 kernel 对象。
LSM 中的接口管理
LSM 中使用 security_hook_heads 将各访问控制模块的接口管理起来。
struct security_hook_heads {
        #define LSM_HOOK(RET, DEFAULT, NAME, ...) struct hlist_head NAME; // 此处定义 LSM_HOOK 为只取接口名字
        #include "lsm_hook_defs.h" // 包含接口文件
        #undef LSM_HOOK
} __randomize_layout;
接口文件 lsm_hook_defs.h 中的内容是这样的:
... ...
LSM_HOOK(int, 0, file_permission, struct file *file, int mask)
LSM_HOOK(int, 0, file_alloc_security, struct file *file)
LSM_HOOK(int, 0, file_ioctl, struct file *file, unsigned int cmd, unsigned long arg)
LSM_HOOK(int, 0, file_mprotect, struct vm_area_struct *vma, unsigned long reqprot, unsigned long prot)
LSM_HOOK(int, 0, file_lock, struct file *file, unsigned int cmd)
LSM_HOOK(int, 0, file_fcntl, struct file *file, unsigned int cmd, unsigned long arg)
LSM_HOOK(int, 0, file_receive, struct file *file)
LSM_HOOK(int, 0, file_open, struct file *file)
... ...
因此实际 security_hook_heads 是这样的:
struct security_hook_heads {
        ... ...
    struct hlist_head file_permission;
    struct hlist_head file_alloc_security;
    struct hlist_head file_ioctl;
    struct hlist_head file_mprotect;
    struct hlist_head file_lock;
    struct hlist_head file_fcntl;
    struct hlist_head file_receive;
    struct hlist_head file_open;
    ... ...
} __randomize_layout;
每个访问控制模块需要定义 security_hook_list 数组,security_hook_list 记录单个接口的信息,然后模块初始化函数中会调用 security_add_hooks 将 security_hook_list 数组链接到上面的 security_hook_heads 上。
struct security_hook_list {
        struct hlist_node                list; // 会将该 hlist_node 链接到 security_hook_heads.接口 上
        struct hlist_head                *head; // 指向 security_hook_heads.接口
        union security_list_options        hook; // 接口函数实现
        char                                *lsm; // 该模块名字
} __randomize_layout;
security_hook_list 是通过 LSM_HOOK_INIT 宏赋值的,调用方法为 LSM_HOOK_INIT(接口, 接口实现),会赋值 head 和 hook 成员变量。
#define LSM_HOOK_INIT(HEAD, HOOK) \
        { .head = &security_hook_heads.HEAD, .hook = { .HEAD = HOOK } }
security_add_hooks 将每个接口的 security_hook_list.list 实际添加到 security_hook_heads.接口 的末尾。
void __init security_add_hooks(struct security_hook_list *hooks, int count,
                                char *lsm)
{
        int i;

        for (i = 0; i < count; i++) {
                hooks[i].lsm = lsm;
                hlist_add_tail_rcu(&hooks[i].list, hooks[i].head);
        }

... ...
}
从 LSM 到 SELinux
当我们想要调用 open 打开一个文件,其简化版的调用路径如下所示:
open
-------
sys_open
do_filp_open
path_openat
do_open
vfs_open
do_dentry_open
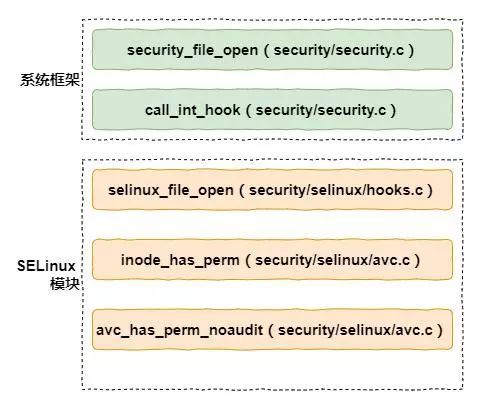
security_file_open
error = security_file_open(f);
if (error)
goto cleanup_all;
其中 security_file_open 就是 open 系统调用的一个 LSM Hook 点,当执行到此处的时候,它会执行所有挂在此 hook 点上的安全检查函数。

以 SELinux 为例,最终会调用到 selinux_file_open 函数。
SELinux 内部结构
在看 selinux_file_open 的代码之前,我们先看一下 SELinux 的内部结构。
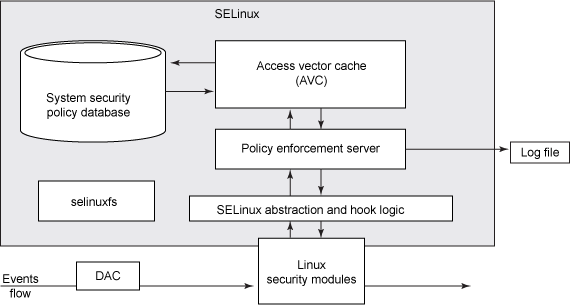
根据上图,我们可以把操作分为以下几个步骤。
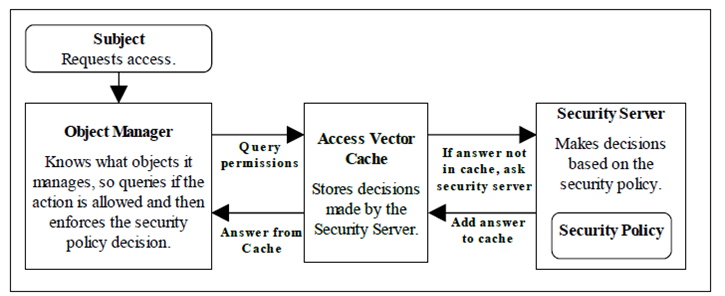
- 操作系统主体尝试访问特定对象(文件、套接字)上的某个操作,这在 Linux 标准自主安全系统(DAC)中是允许的。这将向对象发起一个请求流。
- 每个要求对对象执行操作的请求都由 Linux Security Modules 截获并传递给 SELinux Abstraction & Hook Logic 子系统,同时还包括主体和对象的安全上下文,SELinux Abstraction & Hook Logic 子系统负责与 LSM 交互。
- 从 SELinux Abstraction and Hook Logic 子系统接收到的信息将转发给基本的 Policy Enforcement Server 模块,后者负责确定是否允许主体访问该对象。
- 要接收是否允许或禁止该操作的决定,策略实施服务器将与 Access Vector Cache 子系统通信,后者通常会缓存要使用的规则。
- 如果 AVC 没有包含相关策略的缓存规则,对所需的安全策略的请求将再次转发给安全策略数据库。
- 在找到安全策略后,该策略将被传递给接收决策的策略服务器。
- 如果所请求的操作符合找到的策略,那么将允许执行该操作。反之,将禁止执行该操作,并且所有决策制定信息将被写入到 SELinux 日志文件中。
除了判断是否允许或禁止某些操作外,Policy Enforcement Server 模块还负责执行一些辅助任务,例如安全标签管理(分配和移除)。
一句话总结:请求来了去 AVC(以及后面的 database)查一下,比对是否有权限即可。
现在我们再来看 selinux_file_open 的代码,其实就是一个去 AVC 查找,然后比对权限,返回结果的过程。
static int selinux_file_open(struct file *file)
{
        struct file_security_struct *fsec;
        struct inode_security_struct *isec;

        fsec = selinux_file(file);
        isec = inode_security(file_inode(file));
        /*
         * Save inode label and policy sequence number
         * at open-time so that selinux_file_permission
         * can determine whether revalidation is necessary.
         * Task label is already saved in the file security
         * struct as its SID.
         */
        fsec->isid = isec->sid;
        fsec->pseqno = avc_policy_seqno();
        /*
         * Since the inode label or policy seqno may have changed
         * between the selinux_inode_permission check and the saving
         * of state above, recheck that access is still permitted.
         * Otherwise, access might never be revalidated against the
         * new inode label or new policy.
         * This check is not redundant - do not remove.
         */
        return file_path_has_perm(file->f_cred, file, open_file_to_av(file));
}
selinux_file_open 会调用到 file_path_has_perm
/* Same as path_has_perm, but uses the inode from the file struct. */
static inline int file_path_has_perm(const struct cred *cred,
                                     struct file *file,
                                     u32 av)
{
        struct common_audit_data ad;

        ad.type = LSM_AUDIT_DATA_FILE;
        ad.u.file = file;
        return inode_has_perm(cred, file_inode(file), av, &ad);
}
再调用到 inode_has_perm
/* Check whether a task has a particular permission to an inode.
   The 'adp' parameter is optional and allows other audit
   data to be passed (e.g. the dentry). */
static int inode_has_perm(const struct cred *cred,
                          struct inode *inode,
                          u32 perms,
                          struct common_audit_data *adp)
{
        struct inode_security_struct *isec;
        u32 sid;

        if (unlikely(IS_PRIVATE(inode)))
                return 0;

        sid = cred_sid(cred);
        isec = selinux_inode(inode);

        return avc_has_perm(sid, isec->sid, isec->sclass, perms, adp);
}
再调用到 avc_has_perm
int avc_has_perm(u32 ssid, u32 tsid, u16 tclass,
                 u32 requested, struct common_audit_data *auditdata)
{
        struct av_decision avd;
        int rc, rc2;

        rc = avc_has_perm_noaudit(ssid, tsid, tclass, requested, 0,
                                  &avd);

        rc2 = avc_audit(ssid, tsid, tclass, requested, &avd, rc,
                        auditdata);
        if (rc2)
                return rc2;
        return rc;
}
再到 avc_has_perm_noaudit
inline int avc_has_perm_noaudit(u32 ssid, u32 tsid,
                                u16 tclass, u32 requested,
                                unsigned int flags,
                                struct av_decision *avd)
{
        u32 denied;
        struct avc_node *node;

        if (WARN_ON(!requested))
                return -EACCES;

        rcu_read_lock();
        node = avc_lookup(ssid, tsid, tclass);
        if (unlikely(!node)) {
                rcu_read_unlock();
                return avc_perm_nonode(ssid, tsid, tclass, requested,
                                       flags, avd);
        }
        denied = requested & ~node->ae.avd.allowed;
        memcpy(avd, &node->ae.avd, sizeof(*avd));
        rcu_read_unlock();

        if (unlikely(denied))
                return avc_denied(ssid, tsid, tclass, requested, 0, 0,
                                  flags, avd);
        return 0;
}
如果 AVC 没查找到,还会调用到 avc_perm_nonode
static noinline int avc_perm_nonode(u32 ssid, u32 tsid, u16 tclass,
                                    u32 requested, unsigned int flags,
                                    struct av_decision *avd)
{
        u32 denied;
        struct avc_xperms_node xp_node;

        avc_compute_av(ssid, tsid, tclass, avd, &xp_node);
        denied = requested & ~(avd->allowed);
        if (unlikely(denied))
                return avc_denied(ssid, tsid, tclass, requested, 0, 0,
                                  flags, avd);
        return 0;
}
注意上面两个函数中的 denied = requested & ~node->ae.avd.allowed; 和 denied = requested & ~(avd->allowed); 就是在检查权限了。如果权限不满足,就会返回 avc_denied(ssid, tsid, tclass, requested, 0, 0, flags, avd)。
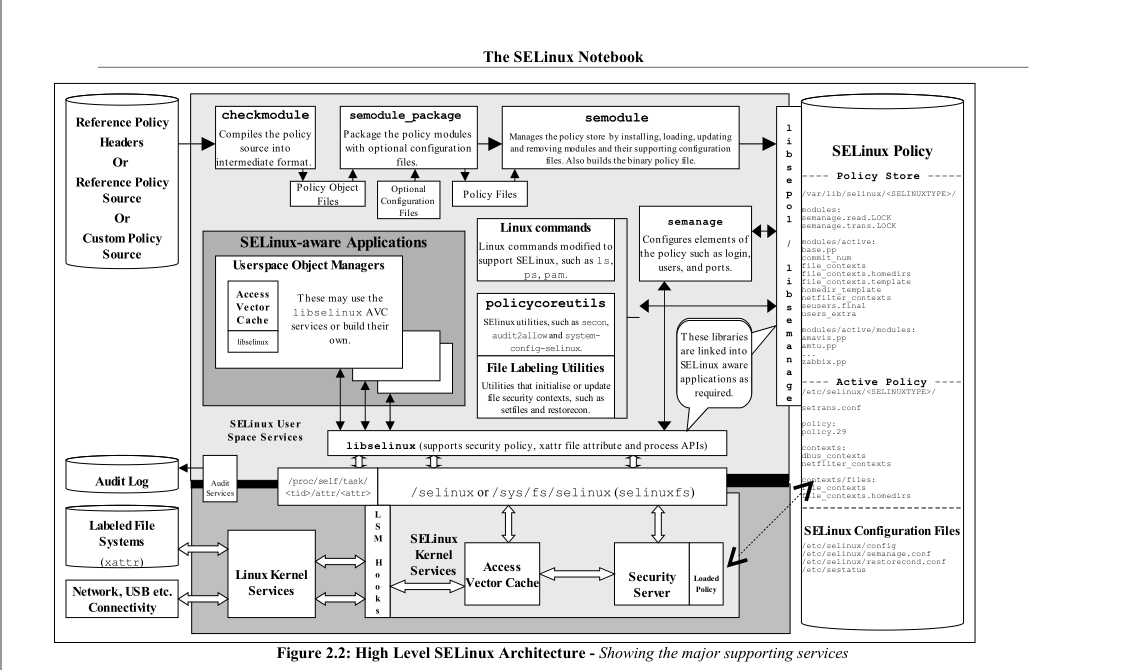
最后放一张更全面的图,上面是用户态,下面是内核态。